The pen tool can be tricky but not impossible. Nonetheless, it is a powerful tool that allows logo designers to create simple, complex, organic, and geometric shapes for their projects. While it may seem intimidating at first, mastering the pen tool can open up a world of possibilities for creating memorable shaped logos.
Without wasting much time, let’s get to business. Following are the cool pen tool tricks you can use in Adobe Illustrator to make a unique logo design people remember.
Trick 1 – Outline the Shape, Don’t Fill
When artists draw an object, they sketch it first before shading or coloring it. The same trick applies to making shapes on digital software. When creating shapes with the pen tool, set it to stroke rather than fill. This way, you’ll follow a systematic process.
To switch between fill and stroke, simply use the side toolbar.
Extra Tip: To see whether the shapes you’ve drawn have no anomalies, press ctrl+Y on your keyboard. To return to your drawing, simply press the same key.
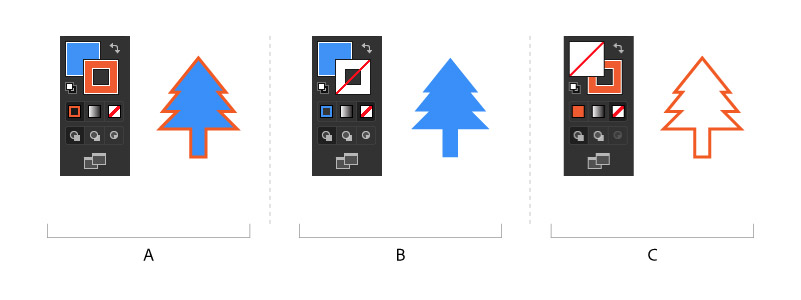
Image Source: adobe.com
Logo Inspirations
Image Source: ZillionDesigns.com

Image Source: ZillionDesigns.com
Trick 2 – Manipulate the Line & Shape
Stop manipulating people and start manipulating shapes. One of the reasons logo designers like using the pen tool is that the lines and shapes can be manipulated. Use the anchor points, and the control handles to change the appearance of the shape.
- What are anchor points?
They are points where the pen tool creates a corner or curve in shape.
- What are anchor points?
These lines extend out from the anchor points and allow designers to adjust the curvature of a shape. Dragging the control handles, you can create smooth, curved lines or sharp, angular corners.
Extra Tip: One way to make your shapes more memorable is to use the pen tool to create unique and eye-catching curves. This can be achieved by manipulating the control handles to create exaggerated or asymmetrical curves.
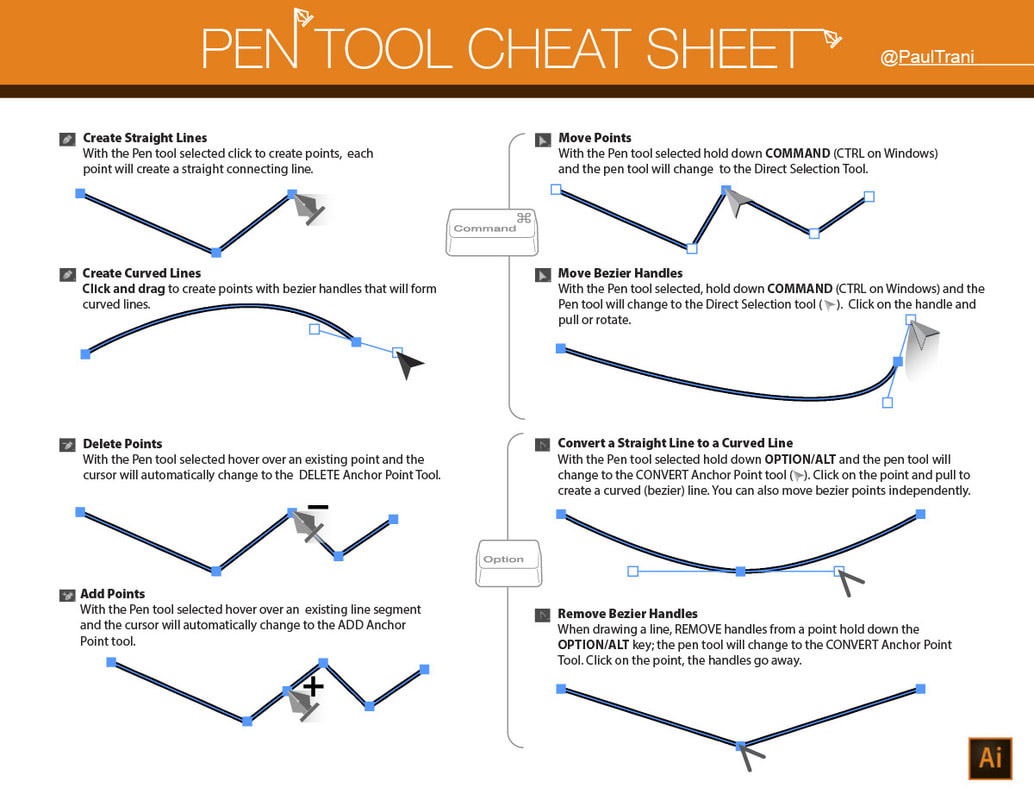
Image Source: lam-animation.weebly.com
Logo Inspirations
Image Source: ZillionDesigns.com

Image Source: ZillionDesigns.com
Trick 3 – Create Combinations of Lines
If you want to draw conventional and simple shapes in Illustrator, you can use the shape tools rather than a pen tool. The point of using a pen tool is to make unique and memorable shapes that attract attention.
To make this happen, designers need to use a combination of straight and curved lines. By alternating between the two, you can create bold and intricate shapes. For example, you will need to draw a variety of lines and shapes to create a mascot for a sports logo.
Extra Tip: The Curvature Pen tool lets you intuitively draw curves and straight segments. It can be found in the pen tool drop-down menu.
Logo Inspirations

Image Source: ZillionDesigns.com
Trick 4 – Color the Pen Tool Path
Illustrator isn’t the only software option for creating logo designs, but it is a common one. This is because it has functions that allow designers to exercise quite a lot of freedom. For example, did you know you can color the shape’s outline and even add a gradient? Pretty cool, huh?
To make exciting and unique logos, you don’t need to stick to the cliche of only coloring the shape. Adding color or gradient to the outline of a shape can add depth to the logo design and help them stand out.
Extra Tip: After swapping from fill to stroke from the toolbar, hit the Gradient Panel and select any of the three types of gradients or adjust the colors.
Logo Inspirations

Image Source: ZillionDesigns.com

Image Source: ZillionDesigns.com
Trick 5 – Convert Pen Tool Path to Shape
Another cool trick is to change the path (line) drawn by the pen tool into a shape. Once this happens, you can apply patterns to it. When designing logos, the whole point is to make something distinguished.
For example, if you are making a logotype for a fashion house, the lines you draw for a custom typography with the pen tool can have patterns on them.
Extra Tip: Click on expand under the object in the top menu bar to convert a path to a shape. To apply a pattern to the line, first, ungroup the shape.
Trick 6 – Make Compound Shapes with Other Tools
Yet another nifty trick is to use the pen tool in combination with other tools to make compound shapes. You can use the Pathfinder Panel to unite separate shapes or the Shape Builder tool to combine simple shapes to create complex objects.
What is a compound shape? It is made up of simple shapes put together. Such shapes are also called complex or composite shapes.
Pathfinder Panel versus Shape Builder Tool:
- The Pathfinder combines objects with its shape modes feature.
- The Shape Builder tool allows you to merge and subtract shapes.
Extra Tip: Depending on the kind of shape, you decide which of the two tools will work with the pen tool.

Image Source: flylib.com
Logo Inspirations

Image Source: ZillionDesigns.com

Image Source: ZillionDesigns.com
Trick 7 – Vectorize Raster Images with Pen Tool
The best thing about the pen tool is that you can trace over photographs or raster images to turn them into a vector. For example, you have a beautiful image of a landscape you want to incorporate into a photographer’s logo. Simply set the transparency level and lock the layer of the image. On a new layer, trace the outlines, and viola, you have the vector version of that scenery.
Extra Tip: Setting the opacity to 60% or & 70% is good enough to trace an image. Make sure to work with stroke and not fill.
Trick 8 – Change Stroke Styles
The pen tool lines don’t need to be boring. Yes, you can change the style of the strokes and make them interesting. To change the stroke style of a path, use the Stroke Panel. It can be found under the Window Menu to choose different stroke weights and cap styles. You can also choose to turn the lines into dashes.
Extra Tip: Mix and match stroke styles to add intrigue to a logo design. Don’t make monotonous lines. Instead, vary the look of the lines for an overall unique appearance.
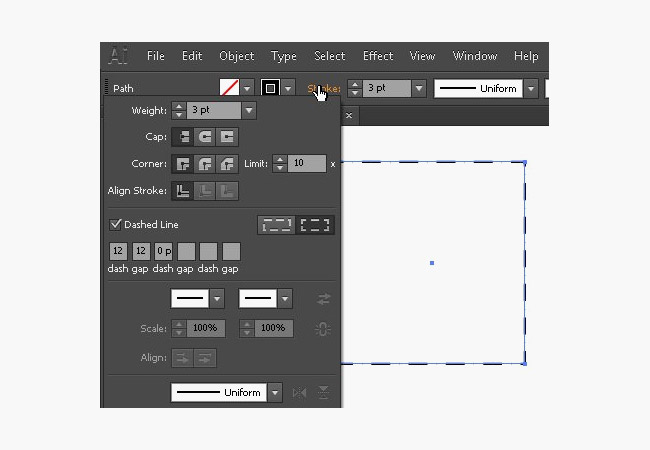
Image Source: dummies.com
Logo Inspirations

Image Source: ZillionDesigns.com

Image Source: ZillionDesigns.com
Trick 9 – Pattern-ize Pen Tool Lines & Shapes
In Illustrator, designers can make simple or complex objects to design logos. One way to create an intricate shape is by creating a pattern or motif from the shape or line you’ve drawn with the pen tool. Either create a pattern preset or use the Rotate Tool to repeat lines and shapes in a circular motion.
Extra Tip: Before using such tools, sketch a basic drawing of the motif or pattern you can create. This will help you trace a section or part of the shape and repeat it.
Logo Inspirations

Image Source: ZillionDesigns.com

Image Source: ZillionDesigns.com
Trick 10 – Curve the Corners
The one thing all logo designers must learn is “shortcuts”! Learn not only the keyboard shortcuts to design better and faster but also know the features of each tool and panel. For example, you can use the Direct Selection tool to curve a corner of a triangle to turn it into a semi-circle.
It’s effortless. You can curve the corners of the shapes made with the pen tool to add curvatures to your object quickly.
Children get easily attracted to organic shapes that have curves, so when you are designing childcare logos, you can curve the corners of sharp-edged shapes.
Extra Tip: Click the anchor points of the shape that need a curve and modify. To equally curve two points, press shift when selecting anchor points. To vary the curve of the line, separately select the points and adjust.
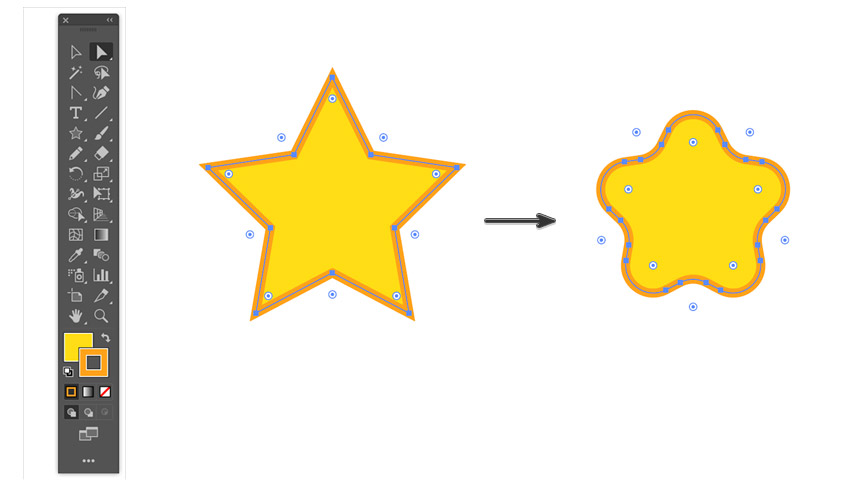
Image Source: flylib.com
Adobe Illustrator is a powerful tool for designers and illustrators. It has various tools that can be used to achieve different effects. These pen tool tricks are the most important ones, as they help create memorable shapes for logos.
The post 10 Pen Tool Tricks In Illustrator To Create Memorable Shaped Logos appeared first on ZD Blog.